Making your own rag rug is easy and hugely satisfying, combining creativity with feel-good factors of recycling and keeping a traditional craft alive.
In the nineteenth century rag rugs were popular within the Shaker and Amish communities as they fitted well with their ethos of living a simple life where nothing was wasted. Rag rugs were also popular among farming families in England and also Scandinavia. Indeed, in bygone days nearly every home in these countries would have proudly displayed their handmade rugs. Nothing was wasted, every little scrap and the least-worn parts of old clothes would have been hoarded to be re-used. Because, no matter how attractive their design, these rag rugs would have been subjected to a lot of wear and tear, very few remain from this time. In some households they would have been laid upside down for everyday use, then turned over to reveal their clean and bright upper surface when visitors were expected. As they became more worn they would have been relegated from the parlour to the bedroom or kitchen and maybe even the dog’s bed before ending their lives on the compost heap.
The methods of creating rag rugs vary, although the most usual method was to use clean empty jute or hessian sacks, opened out and flattened, through which strips of fabric were hooked or prodded.
Some rugs would have been plain and utilitarian, a basic comfort, keeping the workers’ feet off the cold floor throughout the winter months, but usually, after the sack had been opened out and washed, a design was drawn onto it with a piece of charcoal. Sometimes the sack might already have been printed with a trademark such as a cockerel or wheat sheaf and these would have been ready-made designs. During WW2 with its “Make Do and Mend” campaign, washed sandbags were sometimes used as a backing!
Today rag rugs have become a creative and relaxing hobby as we are more environmentally aware and conscious of how much material we’ve been wasting. Rug making is also a satisfying craft that doesn’t require very much expenditure.

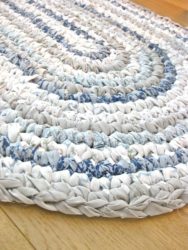
Find the tutorial for this rag rug by Jenna Clair here
Rag rugs are best made from cotton or wool fabrics as synthetics will attract more dirty.. You can use all sorts of old fabrics, such as bed linen, dresses, knitwear and so on – ask your friends for any unwanted clothes that are unsuitable for donation to charity shops. Wash all your fabrics before you begin to make sure they don’t shrink unevenly when you wash your finished rug at a later date.
You’ll need loosely woven fabric for the backing and the only specialist item is a rug hook or large crochet hook. For your first attempt it’s best to try a simple design – perhaps stripes – and keep the dimensions modest so you don’t become too discouraged. A frame is handy to make handling your rug easier.
Once you’ve cleaned and hemmed your backing fabric draw a design on the fabric. The rug is worked right up from the centre outwards if you’re not using a frame.
Hold a strip of fabric beneath the hessian with your left hand (if you’re right handed) with one end at the point you wish to start. Then push your hook down through the hessian and pull the end of the strip up through the fabric. Make your next hole as near to the first as you can and bring up sufficient fabric to make a loop about ½” high. Repeat until you reach the end of your fabric strip, then pull the end p to the surface and trim to the same length as your loops. Start your next strip in the same hole as this end strip and simply continue until your rug is complete.
If you’d like to learn more and have a go at making your own rug, then you might find this video useful: Hooky & Proddy Mats: A Beginner’s Guide.
*Article originally featured in Bustle & Sew Magazine. Find out more HERE
Leave a Reply