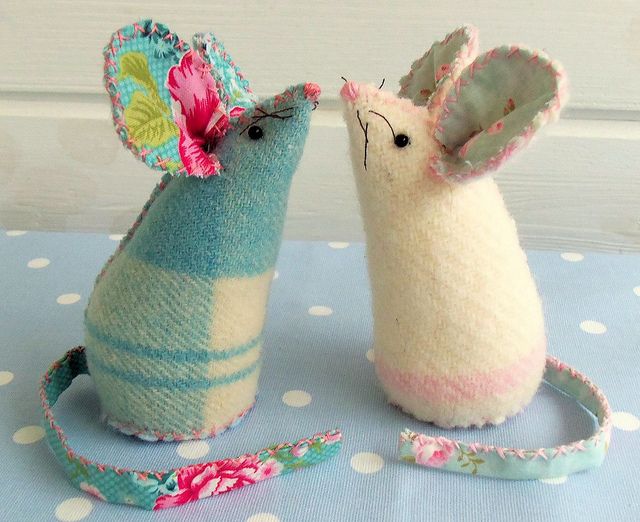
A Bustle & Sew classic, I originally released my take on this old fashioned method of making these little mice back in March 2011. They turned out to be one of my most popular free patterns ever – and now they’re back – and looking more cute than ever! They’re really easy to make, great for fetes, bazaars or for making with children – you’ll have a dozen of the little creatures sitting in a row before you know it!
If you’d like this tutorial as a free pdf file, then click the button below and I’ll send it to you. (If you already receive our free newsletter then you’ll find the tutorial waiting for you in your newsletter readers pattern library).
![]()
Materials:
- 9″ square felt for body and ears
- 6″ square contrast fabric for tail and ears
- 3″ square cardboard to stiffen base
- Rice or poly beads to weight base (optional)
- Polyfil for stuffing body
- Stranded embroidery floss in suitable colour to sew body
- Black stranded embroidery floss for eyes and nose- or use small round black beads if preferred – but this means the mouse will not be suitable for a small child.
- Pink floss for nose
- Dark brown strong thread for whiskers (optional)
Download your templates HERE
Method:
- Cut out all body pieces using the template provided (actual size)
- Cut a strip of fabric for the tail 4″ long x 1 ½” wide. Fold ¼” under along each long side, and then fold in half
lengthways and press. Tuck one short edge in for the tip of the tail and secure with a few small stitches. Using 3
strands of embroidery floss, blanket stitch along the open side of the tail to secure. Set to one side. - Stitch the bottom edge of the body to the circular base with wrong sides together. First work half-cross stitch in
one direction, then return and over stitch in half-cross stitch in the other direction using 3 strands of floss. Then stitch up the back for ½” in the same way, wrong sides together. - Insert the unfinished end of the tail with the blanket stitched seam facing upwards and secure in place with small stitches. Continue up the back for a further 1″ Leave a 1 ½” gap for stuffing and then stitch up to the nose.
- Insert the cardboard circle into the base to keep it flat. Stuff the nose end using small pieces of stuffing to avoid lumpiness. Pour rice or granules if using into the base and then add stuffing to body. When you are happy with the shape, close the back seam.
- Make the ears by placing the pairs of outers and inners together, wrong sides facing and cross stitch around the outer curved edge. Fold the base edge in half and secure with a few stitches, then flatten the seam and position ears on head, either side of the centre back seam so they will frame the mouse’s face.
- The eyes are French knots worked with black floss – or stitch round black beads into place if using.
- The whiskers are strong thread – catch them in place with a small stitch under the nose so they can’t be easily pulled out. Oversew the tip of the nose with pink floss
If you’d like this tutorial as a free pdf file, then click the button below and I’ll send it to you. (If you already receive our free newsletter then you’ll find the tutorial waiting for you in your newsletter readers pattern library).
![]()