Next up in our Stitch Directory is the French Knot. Many stitchers are a bit wary of French knots, but it’s worth taking the time to practise them – once you’ve mastered the technique they’re really quick and easy to work and lend themselves to a variety of uses.

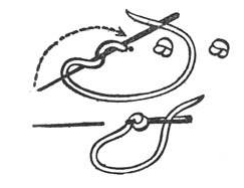
Bring your thread through to the front of your fabric at the place you want to place your knot. Hold it down firmly with your left thumb and first finger and twist your needle two or three times around the held thread as shown by the upper needle in the diagram above.
Then, with your twists pulled fairly tightly around your needle and the thread still held firmly in your left hand, turn your needle around and push it back through your fabric very close to where it first emerged, still keeping your thread tight with your left thumb.
Pull your thread through firmly and the knot will be left on top. If you’re having problems check that you’re twisting the thread around the needle in the same direction as the diagram above and keeping your thread nice and taut.
The secret of successful French knots is in the correct twist of the needle and the tautness of your thread. French knots can be used to provide focus and texture to the centre of embroidered flowers, especially when used as an accent colour. They make little dots that accentuate other shapes, and when scattered over the top of other stitches can soften their lines. They’re also great stitched closely together, touching one another to create a solid effect, or spaced out to fill your fabric with mini polka-dots.
I do hope that you’ve found this post useful, pop back next week when we’ll be looking at the Herringbone Stitch!
*If you missed last week’s post about Fly Stitch you can find it here.*
Leave a Reply