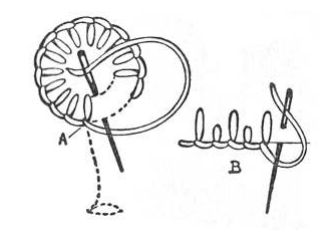
Next up in our Stitch Directory is Blanket Stitch. Blanket stitch is often used as an edging to cover a turned-over raw edge – just as in an old-fashioned blanket – hence the name!

Working from left to right, bring your needle out on the bottom line [A], insert it above on the top line a little to the right and bring it out immediately below, drawing your needle through over the working thread. Then re-insert your needle again on the top line a little further along and bring it out again immediately below on the bottom line, over the working thread. You can see how this is worked in the flower shape in the left-hand diagram. The diagram on the right shows how you can use blanket stitch to edge a piece of fabric – using a contrasting thread to your fabric makes for a decorative and hard-wearing finish for items such as table and bed linen. In this diagram, the stitch has been varied by making the upright stitches alternately long and short. There are a number of ways in which you can make blanket stitch more decorative. Try grouping your stitches in pyramid form, in groups of two long and two short, or any other variation that you choose.
I do hope that you’ve found this post useful, pop back next week when we’ll be looking at Bullion Stitch!
*If you missed last week’s post about Back Stitch you can find it here.*
Leave a Reply