Next up in our Stitch Directory is Cross Stitch. Cross stitch is also known as “sampler stitch” probably because of its almost universal use in samplers, both new and old. It’s also used in most counted work embroidery in which the crosses are all the same size. But cross stitch can also be stitched freehand, placed in all sorts of different ways, and not necessarily joined together.

When you work cross stitch it’s essential that all the top stitches slant in the same direction as if they’re stitched at different angles your work will look messy and uneven.
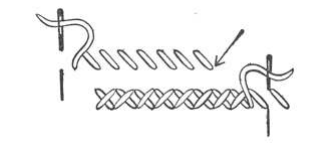
It’s probably easiest, and most economical with thread, to work cross stitch in two parts. Start at the arrow on the diagram and make equal sized slanting stitches along the row you want to work. This forms the first part of each cross. Then return along the row, making similar slanting stitches, but this time in the other direction, to complete the cross shape.
It is more correct for the top stitch of the cross to travel from bottom let to top right-corner, so it’s best to start on the right then work over to the left and back again to the right as shown in the diagram. If you work cross stitch this way you’ll find the back is very neat, consisting of evenly-spaced upright stitches.

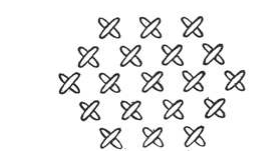
You can use cross stitch as a filling stitch by working it at regularly-spaced intervals over the shape you want to fill. You can place the crosses much closer than in the diagram above, so that they touch each other, if you want a more solid effect.
I do hope that you’ve found this post useful, pop back next week when we’ll be looking at Feather Stitch!
*If you missed last week’s post about Chain Stitch you can find it here.*
I did some freehand cross-stitching the other day. It was quite satisfying
Julie xxxxx
Huge THANKS for your helpful stitching tutorials!