Next up in our Stitch Directory is Fly Stitch. Fly stitch is actually a kind of open detached chain stitch, though the effect it produces is quite different. It can be used singly, in rows or in vertical lines, placed close together or spaced widely apart.

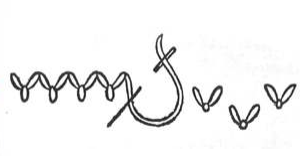
To achieve a nicely-shaped fly stitch it’s easiest to imagine that you’re working a kind of V-shape. Bring your thread out at the top of the left arm of your V and then re-insert it back down through your fabric just opposite at the top of the right arm. Then bring it out again at the base of the V and pull it through over the working thread as shown in the diagram above. You will have formed a loop which you tie down with a small stitch taken into the material just below.
It’s fun to vary the lengths of your final “tying” stitch as doing this will produce different effects. A very short tying stitch is shown on the detached fly stitches to the right in the diagram above, and longer ones in the group of stitches on the left.

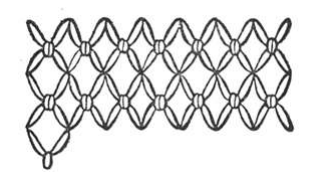
You can also create a very attractive trellis effect filling with fly stitch – and this is very easy to work. Just stitch a row of fly stitches as described above. The second row is upside-down fly stitches placed so that their little tying-down stitches are directly adjacent to those of the first row and so link up the two in the form of an elongated cross. Then simply repeat these two rows until you have covered the entire area you want to fill.
I do hope that you’ve found this post useful, pop back next week when we’ll be looking at French Knots!
*If you missed last week’s post about Feather Stitch you can find it here.*
Leave a Reply