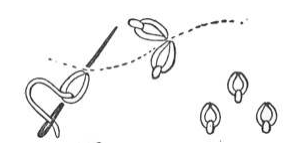
Next up in our Stitch Directory is the Lazy Daisy Stitch. Lazy daisy stitch is actually a detached chain stitch and you’ll sometimes see it referred to by this name. It’s one of the first stitches that newbie embroiderers learn and is a very pretty stitch – great for leaves and petals.

Bring your thread to the front of your fabric and hold it down a little to the left with your left thumb. Then reinsert your needle back down into the fabric at the exact point you brought it out before and then bring it out again a little further below – the length you want your stitch to be. Then draw it through over the working thread. The loop you’ve made is secured by taking your needle through to the back over the end of the loop and just outside it. The needle in the diagram above is making this tying down stitch and, in the same movement is returning to the stitching line, ready to work another lazy daisy stitch on the other side of the stem to represent leaves. Lazy daisy stitch may also be used as a filling, spacing your stitches evenly as shown on the right.

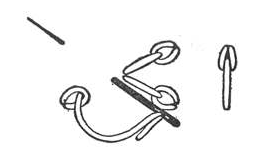
You can also vary lazy daisy stitch – working it in exactly the same way as before, but making the looped part of the stitch quite small and the tying down stitch into a long tail. This variant can also be arranged singly or in groups.
I do hope that you’ve found this post useful, pop back next week when we’ll be looking at the Running Stitch!
*If you missed last week’s post about Herringbone Stitch you can find it here.*
Leave a Reply