
Next up in our Stitch Directory is Bullion Stitch. Whilst not complicated in itself, bullion stitch is perhaps one of the trickiest stitches in this book to work successfully. I would highly recommend practising on some scrap fabric first – but it is such an attractive stitch it’s well worth spending a little time to get it right.
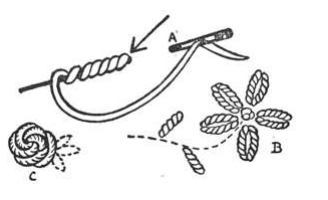
Bring your needle through your fabric at the point indicated by the arrow on the diagram above. Insert your needle back through your fabric at the required length of the stitch and bring it out exactly at the arrow again.
Don’t pull your needle right through, but leave it lying in the material as in the diagram and twist your thread around it close up to the emerging point. Six or seven twists are an average number, but this can be varied according to the length of stitch you want to make.
Place your left thumb upon the twists and pull your needle and thread through your fabric and also the twists as carefully as possible. Now pull your needle and thread away in the opposite direction. This movement will force your little coil of thread to lie flat in the right place. Tighten it up by pulling your working thread, then reinsert your needle at A. This should also be the end of your bullion knot if you’ve chosen the correct number of twists to fill the space.
You may find it easiest to use quite a heavy needle with a small eye so that it will pass easily through your twisted thread and practise with a thicker thread before trying to use a finer one. The diagrams at B and C show bullion knots used to form petals and rosebuds – a very pretty effect!
I do hope that you’ve found this post useful, pop back next week when we’ll be looking at Chain Stitch!
*If you missed last week’s post about Blanket Stitch you can find it here*
Leave a Reply