I love to sew – all kinds of sewing – apart from mending, that is! I really don’t like sewing buttons back on, and can’t understand why they come adrift so frequently, even on quite expensive garments. But I’m getting a bit off the point, as I really wanted to post about hand embroidery today – my first love, and almost my very favourite thing to do. I can’t remember a time when I didn’t “embroider” though I’m not sure some of my earliest efforts could really be called that! One of the nicest things, I think, about hand embroidery is that it’s so accessible – you don’t need expensive equipment and material, and it’s also portable so you can do it (almost) anywhere! It is tempting though to stick to familiar stitches which is why earlier this year, I experimented with a little bear design incorporating four stitches – all beginning with “B”.
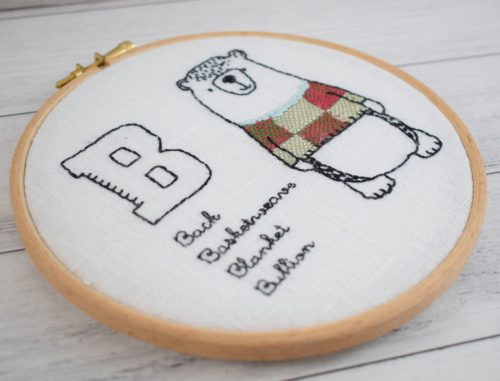
I’m sure most people will be familiar with back stitch and blanket stitch, though perhaps less so with basketweave and bullion. I hadn’t used basketweave before, but was totally smitten with it, and have used it in several designs since. I really enjoyed stitching this bear, and so I thought I’d share the tutorial here on the blog today – he’s a fun little project and a great way to learn and practice these stitches.
If you’d like this tutorial as a free pdf file, then click the button below and I’ll send it to you. (If you already receive our free newsletter then you’ll find the tutorial waiting for you in your newsletter readers pattern library)
![]()
To stitch your own bear you will need:
● 6” embroidery hoop
● 9” square background fabric. I used a nice slubby white linen fabric, but any non-stretchy, firmly woven fabric will be absolutely fine
● Stranded cotton floss in black and five other colours of your choice. This is a good project to use up any ends of skeins left over from other projects.
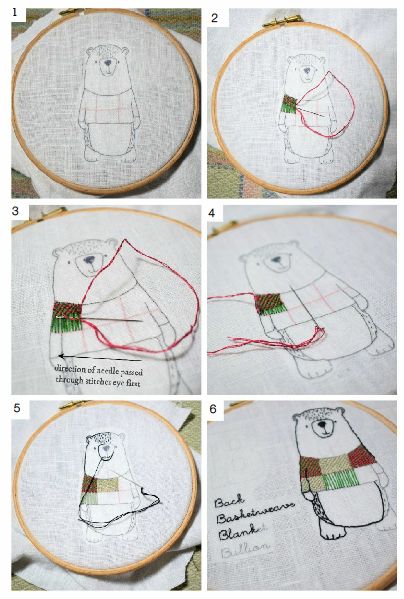
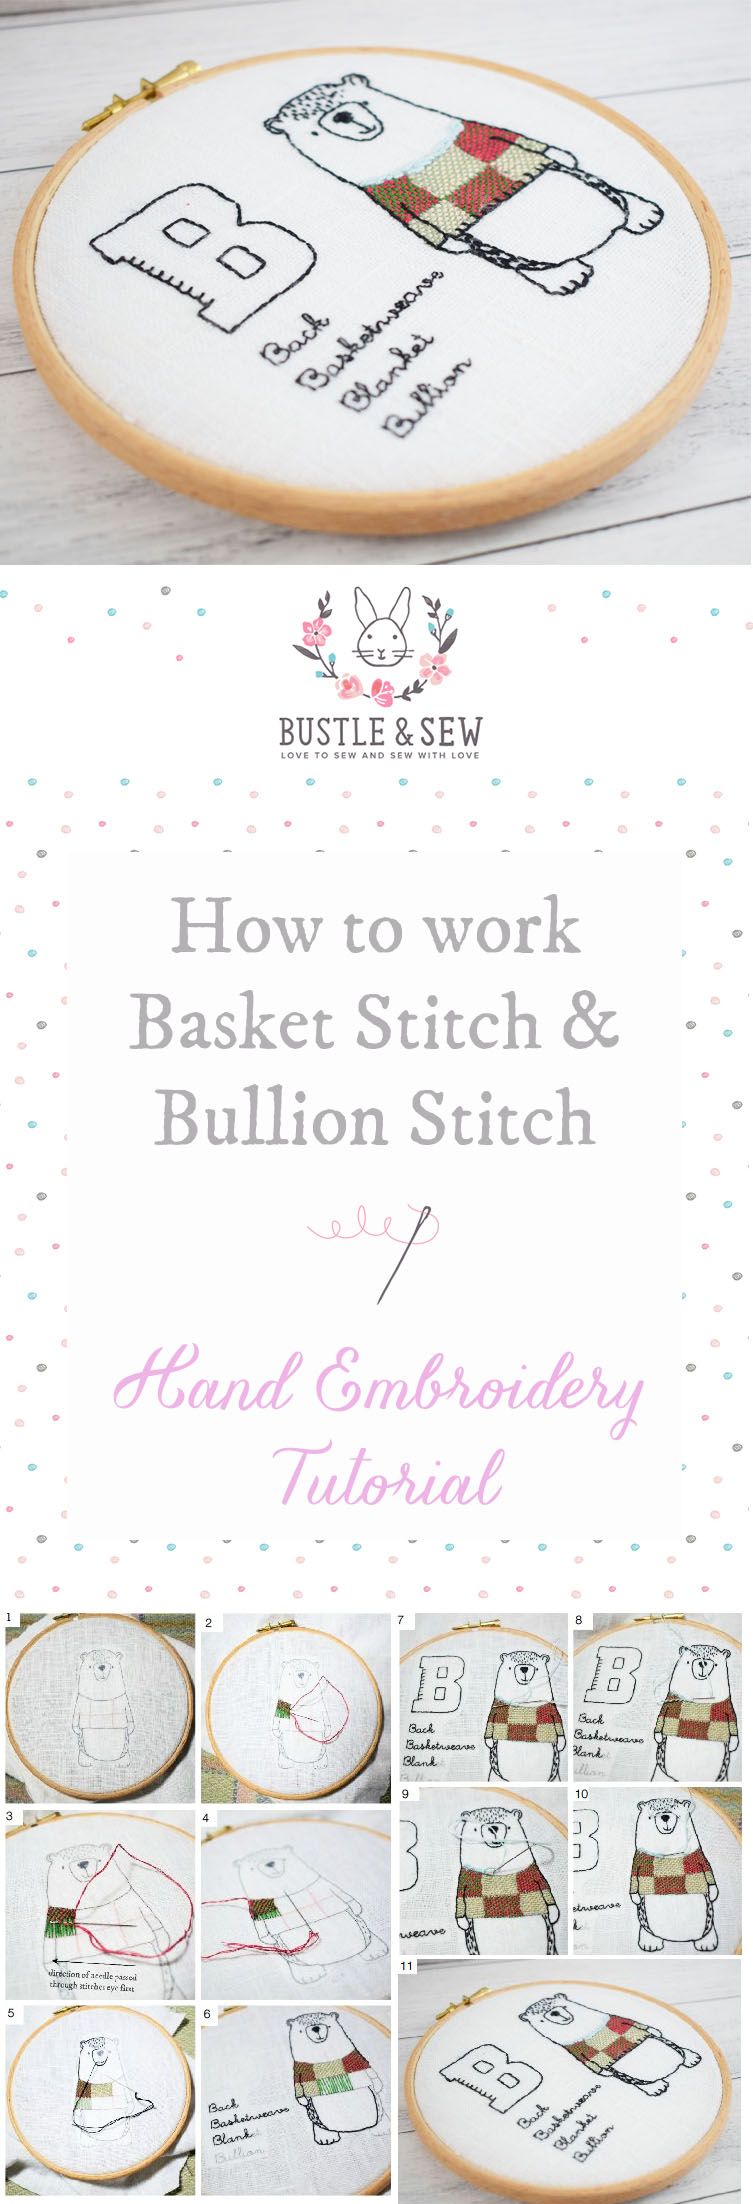
Download the full-size template and transfer the design to the centre of your fabric. Be sure to mark in the squares for his jumper shown as pink lines (1)
Basket Weave Stitch
● With two strands of floss begin on one of the end squares and first work your vertical stitches. They should not be placed too closely together as this will make it (a) difficult to weave your needle in and out and (b) won’t leave much space for your horizontal stitches to show and you’ll lose the nice chequered effect of working with two colours.
● There’s no need to carry your thread across the back of your work to come up again on the same side as you do with satin stitch – just make a very tiny stitch on the back of your work. This makes basket weave a very economical stitch to work floss-wise.
● Keep your stitches nice and vertical – do watch out for any tendency for them to start to lean to one side as this will also spoil the effect you’re seeking.
● When finished fasten off your thread and change to your second colour. Come up in one corner and start to weave your needle through the vertical threads (2). I find it easiest to reverse my needle and pass the eye through first (3). This means I am much less likely to pierce the existing stitches and/or fabric as I go. It may not work for you but it’s definitely worth a try! When you get to the end of your row, pull the thread through fairly firmly (but don’t yank too hard) and then with the blunt end of your needle push the thread into position so that the horizontal rows lie against each other. Don’t push too hard though, simply touching is sufficient. Then take your needle back down through the fabric, make a tiny stitch, approximately the width of your floss and then come up again and go back the other way.
●When you’ve finished the last row you can comfortably fit in you may want to adjust the way the horizontal stitches lie so that the background fabric is evenly covered. Again you can gently move them with the blunt end of your needle. Continue in this way for the remaining squares.
Back Stitch
● This is one of the easiest stitches to work but does need a little care to produce the best possible results.
● When you’re stitching with black thread on a white or pale background do try not to carry floss across the back of your work or leave long tails as these are likely to show through.
● The bear is stitched in two strands of floss. Be super-careful to make sure that you take your needle back down in exactly the same place you brought it up through the fabric.
● Where two lines meet, it gives the nicest finish if you can make all the stitches meet at a down point. So for the bear’s mouth I worked two horizontal stitches, then brought the line of his nose down into the hole between them (5).
● The text is stitched in a single strand of black floss. Take your time over this. You can make longer stitches for the straight parts of the letters, but will need to make very tiny stitches for the small loops and curves. A good rule of thumb is if you think you can probably get away with one stitch, then you really should be making two! (6)
Bullion Stitch
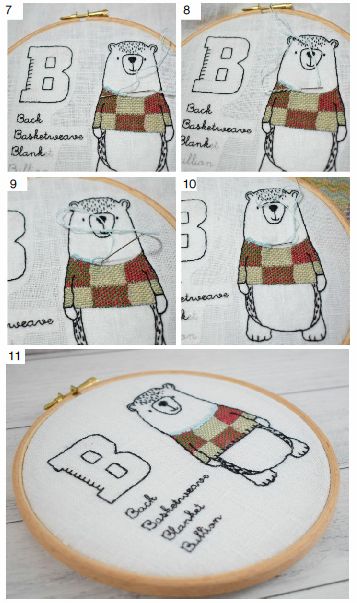
I placed bullion stitches worked in 2 strands of light blue floss along the top of the bear’s jumper. These do need a little practice to work successfully – the key is to keep tension in the thread you’re wrapping round both as you wrap and as you pull the needle through the loops. The steps are as follows:
● Bring your needle up through the fabric at the point marked with the arrow above and then take it back down at the required length of your stitch and up again at exactly the same point as before (7). Don’t pull your needle right through, but leave it lying on your fabric and twist the thread around it (8). Six or seven twists are about right. Place your left thumb upon the twists and pull your needle and thread through your fabric and also the twists as carefully as possible. Now pull your needle and thread away in the opposite direction. This movement will force your little coil of thread to lie flat in the right place. Tighten it up by pulling your working thread, then reinsert your needle at A. This should also be the end of your bullion knot if you’ve chosen the correct number of twists to fill the space. (9 and 10) Continue until the trim is finished.
And that’s it! One final tip – as my linen is quite loosely woven, when mounting for display I backed it with a circle of white felt. This meant I still had the lovely texture, but a much more uniform colour as no light could penetrate through the holes.
If you’d like this tutorial as a free pdf file, then click the button below and I’ll send it to you. (If you already receive our free newsletter then you’ll find the tutorial waiting for you in your newsletter readers pattern library)
![]()
I appreciate the delicate sensitivity involved in the work.
Hello, this is such a lovely pattern that we’ve featured it in our Top 5 Flora & Fauna Embroidery Tutorials post over at halfarsedcrafts.co.uk – hope that’s ok. You can check out the post here http://halfarsedcrafts.co.uk/top-5-flora-fauna-embroidery-tutorials-to-try-now/
Thank you Sam, and what a lovely collection, we’re honoured to be included.