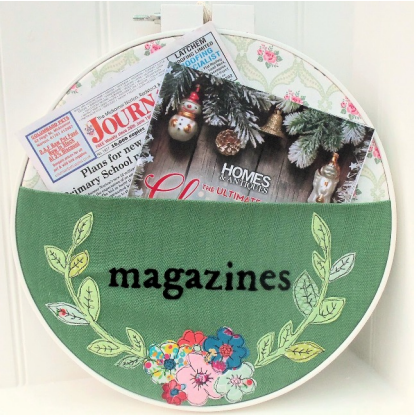
This is a 14” quilting hoop featuring a machine applique pocket with a touch of hand stitching – perfect for keeping my magazine collection in good order!
If you’d like this tutorial as a free pdf file, then click the button below and I’ll send it to you. (If you already receive our free newsletter then you’ll find the tutorial waiting for you in your newsletter readers pattern library).
![]()
Materials:
● 18” square medium weight background fabric (I actually used an Ikea tea towel!)
● 18” x 14” plain fabric for front pocket
● Black stranded cotton embroidery floss
● Scraps of cotton and felt for applique
● 14” quilting hoop
● Chalk paint or emulsion to paint your hoop (optional but does look nice)
● Hot glue gun
● Bondaweb
● Embroidery foot for your sewing machine
● Black and a light coloured thread
Note: Be sure to using a quilting hoop, not a hand embroidery hoop, for this project. Quilting hoops are deeper, stronger and have a heavier weight screw mechanism which you will need to support the weight of your magazines.
Method:
● If desired remove the screw mechanism from your hoop and paint the outer ring with chalk paint or emulsion. Put to one side to dry.
● Transfer the design to your plain fabric The bottom flower should be 2 ½” up from the bottom edge.
● Embroider the text by hand. Use three strands of black floss and split stitch. Pay attention to the curves of the letters and make your stitches smaller to follow the curves more accurately and smoothly where necessary.
● I used Sulky Sticky Fabri Solvy to transfer my design, and before dissolving it away I ran a line of stitching up through the centres of the leaf garlands on either side to act as a guide when placing the applique shapes. (1)
● Trace the applique shapes on to the paper side of your bondaweb. Be sure to use the reverse template for the flowers, and then the leaves are mirror images.
● Cut the shapes out roughly and fuse to the reverse of your fabric/felt. I find it helpful to make a cut into the shape before fusing to the fabric – this helps when I peel off the paper backing (2). Add a little extra to the flowers at the back so they can be overlapped by the shapes on top without leaving any ugly gaps (2).
● Notice that for the leaves I’ve cut the stalks and some of the leaves from felt and then added extra leaves in green fabrics for variety and interest.
● Leave the flower centres for the moment – you’ll come back to those when you’ve appliqued your shapes.
● Position your shapes onto your background fabric and when you’re happy with the positioning, fuse into place with a hot iron. Use a cloth to protect your work.
● Fit the embroidery foot to your sewing machine and drop the feed dogs. With black thread in your needle and a pale colour in your bobbin stitch around the edges of the shapes. Go around twice – not too neatly – you’re aiming for a sort of scribbled effect. Make little indents for the flower petals and stitch the veins on the leaves too (if you’re not confident to do this freehand then use a temporary fabric maker to draw stitching lines first).
● Now add the flower centres and stitch – I tried to make each flower centre slightly different. You add these after the main applique is finished as they do tend to slip around if you catch them with your embroidery foot while doing the other shapes (at least I’ve found this to be the case). You can see a large photo of the finished applique on the next page (3). When finished press your work lightly on the reverse.
● Fold the top edge of your front panel over to the back, with the fold approx ½” above the top of your design. You can stitch into place but I didn’t do this as I didn’t feel it was necessary – it will be held in place at the sides by the hoop.
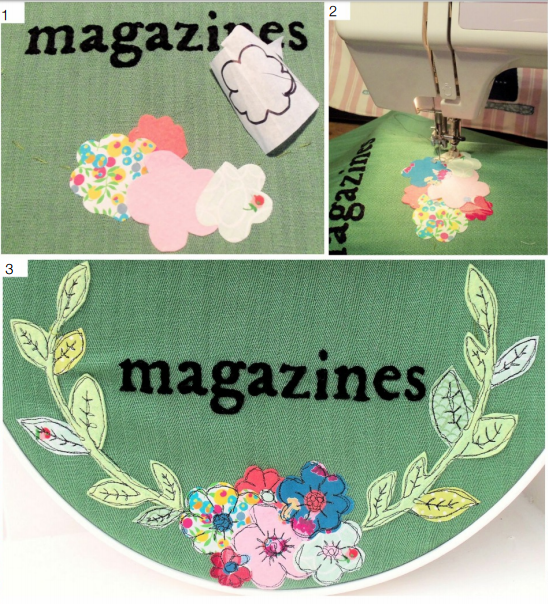 ● Place your front panel on top of the back fabric and mount together in the hoop, making sure the bottom of your design is at the centre bottom of the hoop (3).
● Make sure they’re taut and tighten the hoop as far as you can. (The fabric will stretch a little with use).
● Trim fabric to 1” beyond hoop edge, turn to back and secure with hot glue gun.
● Hang your magazine pocket, fill with your favourite publications and wait for compliments!
![]()
If you’d like this tutorial as a free pdf file, then click the button below and I’ll send it to you. (If you already receive our free newsletter then you’ll find the tutorial waiting for you in your newsletter readers pattern library)
![]()