I love making items for children, it’s so much fun – and I was delighted to be able to make this little nursery wall hanging to welcome the arrival of baby Isla, the new little daughter of one of Rosie’s best friends – who is also Freddie’s godmother. Rosie tells me that Isla’s nursery is cloud-themed, and though I’ve seen quite a few cloud mobiles and wall hangings, I haven’t seen one that looks the same as mine – possibly because, being me, I can’t resist adding quite a bit of hand embroidery – that’s just the way I’m made! Anyway, I thought that you might enjoy making one too, so here is the tutorial for you ….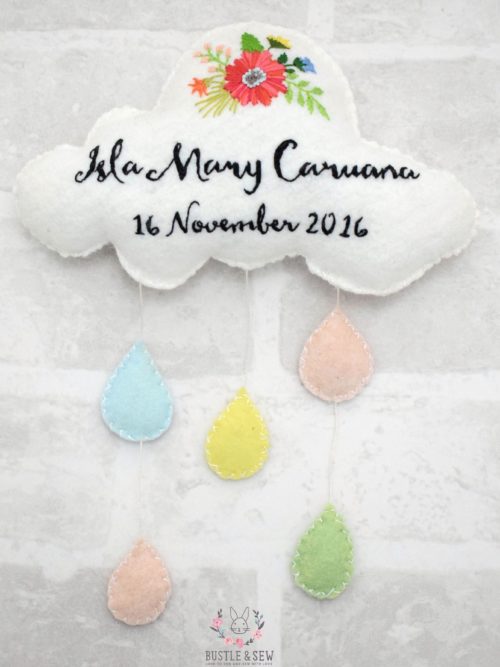
You will need:
- 18″ x 12″ white wool blend felt. Don’t be tempted to use cheap acrylic craft felt as this isn’t nice to sew with and as it tends to be a bit stiff won’t give you a nice softly rounded cloud.
- Scraps of pastel coloured felt
- Stranded cotton floss in black, white, two or three shades of green for leaves and whatever colours you like for the flowers
- Toy stuffing
- Pearl thread
- Long needle (optional but very useful)
- Temporary fabric marker pen
Method:
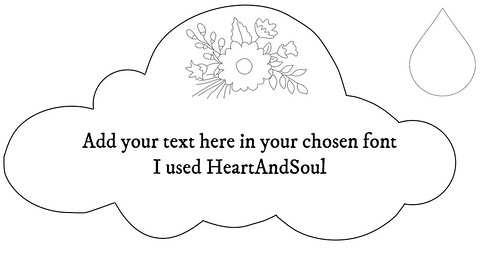
● Draw around your white cloud template onto your white felt with your temporary marker pen. Do not cut out yet.
● Transfer your embroidery design to the felt using the shape you have drawn as a guide.
● Stitch the design. Use two strands of floss throughout.
● The large flower is worked in radiating straight stitch. I find it easiest to work stitches at 3, 6, 9 and 12 o’clock then fill between them – this helps keep my stitches properly angled towards the centre. I used a variegated floss for the large flower which gave a nice effect. The centre is small single twist French knots – I worked a centre ring in purple which I surrounded with light blue.
● The text is worked in split stitch – be careful to keep your stitches nice and small when you’re stitching around the curves of the letters – this will ensure they’re nice and smooth.
● When your embroidery is finished cut out the cloud shape analso a second cloud in white felt.
● Join the shapes with wrong sides together using whip stitch in 2 strands of white floss. Return in the other direction to make a decorative cross stitch. Leave a gap at the bottom for stuffing.
● Stuff lightly and close the gap.
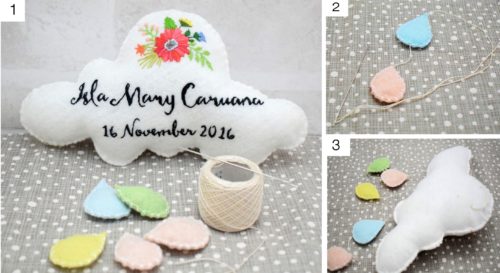
● Cut and join your raindrop shapes in the same way. I used white floss for all the shapes. (1)
● Thread your long needle with pearl thread and join the raindrops together through their centres (2) then stitch to the bottom of the cloud.
● Repeat for the other strands of drops and then stitch a hanging loop on the back (3)
If you’re a reader of our free newsletter, then you’ll find a link to download an easy to use printable version of this tutorial in the newsletter readers’ pattern library. If you don’t already receive our free newsletter and would like this tutorial in a printable version (and lots of other nice goodies too) then please just CLICK HERE to join. And don’t worry – we never ever share your details with anyone else – promise!
Leave a Reply