
The last stitch in our Stitch Directory is Stem Stitch. Stem stitch can be used not only for plant stems (!) but also for outlines when you want to create an unbroken, smooth line. The individual stitches overlap one another and stitching at slightly different angles will give you a wider or narrower line.
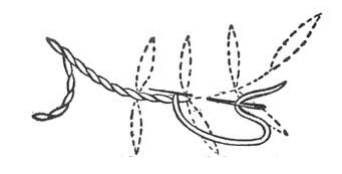
This stitch is worked from left to right. Bring your needle to the front of your fabric at the beginning of the line you want to cover. Take it back through the fabric a little further to the right, then bring it out again a short distance to the left.
You can see from the diagram above that stem stitch is actually a long step forwards and a short step back each time. In the diagram you’ll see that the needle is making the stitch at a slight angle to the line being covered. This will create a broad twisted stem, but if you want a narrower line then your needle must enter and emerge on the line itself. When you’re working stem stitch your thread should always be kept below or to the right of your needle.
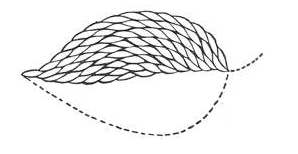
Stem stitch can also be used as a filling stitch – making a very solid, almost woven appearance to the shape being filled. When using it as a filling stitch, your stitching lines should follow the outline of the shape and your stem stitches should be very even and regular. At the beginning of each row make your first stem stitch a little longer or shorter than the first stitch of the previous row to give an effect of diagonal lines across your shape.
I do hope you’ve found our Stitch Directory useful – if you missed last week’s post about Seed Stitch you can find it here!
Leave a Reply